How to Stop Audacity When Recording and Then Record Again N the Same Track
Audacity offers many tools which let the user to play all or function of a sound. There are also many recording options.
Contents
- Controlling Playback and Recording
- Send Toolbar
- Using keyboard shortcuts
- Adjusting the Playback book
- Playing at slower or faster speeds than normal
- Pinned caput Playing and Recording
- Playback
- Quick-Play using the Timeline
- Scrubbing and Seeking
- MIDI (and Allegro) Playback
- Recording
- Overdubbing
- Timer Recording
- Sound Activated Recording
Controlling Playback and Recording
Send Toolbar
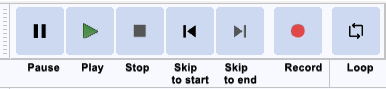
The easiest way to control Audacity playback and recording is with Transport Toolbar:
-
 Clicking Play plays from the cursor bespeak to the finish of the project, or from the first of the choice region to the terminate of that region.
-
-
 Play Cut Preview will play audio either side of a selection to preview what deleting the selection will sound like. Hold downwards Ctrl (⌘ on Mac) while clicking Play.
 - Alternatively you tin use the C shortcut to preview the cutting. This likewise causes the Play button image to change to Play Cutting Preview.
-
Clicking Play when the track is already playing or paused is a quick way to restart playback without beginning pressing Cease.
-
 Clicking Record or using the R shortcut always begins recording at the end of the currently selected track(s).
-
-
 The alternative Tape New Track action for the Tape button is activated by holding Shift while clicking Record. The button changes to display the Record New Track icon. This will start recording in a new rail at either the current cursor position or at the commencement of the current selection.
-
-
 Click Break, or its shortcut P, to temporarily pause playing or recording without losing your identify. Click Pause a second time to resume.
-
 Clicking Stop stops playing or recording immediately, and releases Pause if depressed.
-
- Click Loop, or it'due south shortcut Fifty to set a loop region. When yous employ it the kickoff time, it'll set your current selection to the loop region. If you press Play with looping enabled, it will loop the electric current loop region over and over.
Using keyboard shortcuts
When yous go more used to Audacity, it is often easier to use keyboard shortcuts for repetitive actions similar playing, pausing and recording. Below is a listing of the equivalent keyboard shortcut for each of the Transport Toolbar buttons, with a description of what each push and its shortcut does.
-
Button Shortcut What it does Pause P Press in one case to suspension playback or recording and so in one case to resume. Play or Finish Space Printing once to offset playback then once to stop. Starting playback again starts from its original starting position at the cursor. Play/Stop and Prepare Cursor X This acts exactly like Space when starting playback, just when used to stop, the cursor or start of the pick is set to the position where playback was stopped. Play to Selection B Plays to or from the current mouse pointer position to or from the start or end of the selection, depending on the pointer position. Play Cut Preview C Plays ii seconds of sound before the choice so one second of audio after the selection - thus simulating what playback would audio like if the selection was deleted.
The times are customizable in Playback Preferences.Loop on/off L Enables looping, in which the loop region will exist played over and over upon pressing space. Play Once Shift + Space Plays the looping region only once when looping is enabled. Motion to Next Label Alt + Right Places the editing cursor or choice to correspond with the adjacent label and restarts playback from there, without opening the label for editing. After the final characterization is reached, using the shortcut again jumps playback to the first label. Not available while recording. Move to Previous Label Alt + Left Places the editing cursor or selection to correspond with the previous characterization and restarts playback from there, without opening the characterization for editing. After the first characterization is reached, using the shortcut again jumps playback to the final label. Not available while recording. Skip to Start Domicile Move the cursor to start of project. Skip to Finish End Movement the cursor to finish of project. Record R Tape starting from the cease of the selected rails(s). Record New Track Shift + R Record in a new track starting from the cursor position or start of the selection.
Adjusting the Playback volume
Yous tin conform the playback book using the output level slider in the Mixer Toolbar.
The Playback Meter volition show you the overall volume of all of your tracks when mixed together.
Playing at slower or faster speeds than normal
Using the Play button in Play-at-Speed Toolbar plays at a constant speed merely slower or faster than normal.
Envelope Tool on the Tools Toolbar, when used in conjunction with a Time Track, allows a speed envelope to exist fatigued which tin increase or subtract playback speed over the length of the sound.
Pinned head playing and recording
You can alter Brazenness to play and record with a stock-still head pinned to a position in the Timeline. In this mode the caput remains static and the waveforms will move as the audio is played or recorded.
This beliefs is controlled by using the push at the left of the Timeline. By default this shows as a dark-green downwards-pointing triangle (like the play head). In this manner, the play head or record head will move horizontally and the waveform volition scroll when necessary, except that if Auto-scroll if head unpinned is unchecked in Tracks Preferences so scrolling volition non occur.
Clicking on the greenish triangle will cause a context bill of fare to be popped upwards. From that context menu y'all tin check on Pinned Play Head. This will cause the button icon to change to a drawing-pin which indicates that the play head or record caput is now pinned to the centre of the Timeline and when playing or recording takes identify the waveform volition motion continuously under the stock-still caput.
Unpinned or pinned caput tin also be selected in .
| | The default pinned position is the middle of the Timeline, but you tin change this by clicking on the pinned caput and dragging it along the Timeline while you are playing or recording. A double-click on the head will restore information technology to its default position in the center of the Timeline. You may find that centered is the most useful when using playback just for recording, repositioning the head to the right may be useful. |
For details on setting and united nations-setting pinned play and record head please see Pinned Play/Record Head on the Timeline page.
Playback
For fuller details of how to apply playback, including keyboard shortcut commands and how to preview short sections, please see the Playback page.
Quick-Play using the Timeline
Timeline Quick-Play provides a quick and convenient means to either start playback from any point within the current project or to playback a region of audio.
For details encounter the Quick-Play section on the Timeline page.
Scrubbing and Seeking
Scrubbing or Seeking is the action of moving the mouse arrow right or left then as to adjust the position, speed or direction of playback - a convenient manner to apace navigate the waveform to detect a particular event of interest.
Scrubbing or Seeking in Audacity is initiated by using the Scrub button ![]() or Seek button
or Seek button ![]() in Scrub Toolbar
in Scrub Toolbar ![]() . Alternatively yous tin use the card item and select or from the cascading card.
. Alternatively yous tin use the card item and select or from the cascading card.
Audacity will remain in scrubbing/seeking mode until you return information technology to normal play mode. Clicking the Stop push ![]() (or its shortcut Infinite) at whatsoever time will terminate scrub/seek play and return you to normal play mode moving the cursor to the electric current scrub/seek play position. If yous wish to terminate scrubbing or seeking without losing the position of the editing cursor or selection, apply the Escape Esc central.
(or its shortcut Infinite) at whatsoever time will terminate scrub/seek play and return you to normal play mode moving the cursor to the electric current scrub/seek play position. If yous wish to terminate scrubbing or seeking without losing the position of the editing cursor or selection, apply the Escape Esc central.
Please run into Scrubbing and Seeking for details
MIDI (and Allegro) Playback
MIDI (and Allegro .gro) files can be imported into Brazenness with to a Annotation Runway.
Brazenness can now play these MIDI (and Allegro) files, merely note that there will no use of the Playback meter while Note tracks are played. Although Note track playback should just work on Windows, on Mac and Linux additional software may be required.
Editing these Note tracks is possible, but very limited.
For more than details please run across: Note Tracks.
Recording
For fuller details of how to use recording, including how to control where and which rails you lot record in and keyboard shortcut commands, please see the Recording page.
When you click the Record button ![]() on Send Toolbar, or utilize the R, Audacity will record at the finish of the currently selected (or only) track, or create a new track if you have an empty project.
on Send Toolbar, or utilize the R, Audacity will record at the finish of the currently selected (or only) track, or create a new track if you have an empty project.
When recording like this, at the end of an existing recording, Brazenness volition identify a Clip line at the junction between the two recordings to assistance y'all in separating them afterwards if required. Run into the Recording page for details.
| | When making recordings, particular critical recordings, you should consider shutting down all other applications giving Audacity sole utilize of the computer. This tin assist to avert skips, small dropouts, and ticks in your recordings. And on Mac that means fully Quitting them not just endmost them, every bit otherwise Mac volition leave them open consuming computer resources. |
Overdubbing
Yous can tape a new track while listening to previously recorded tracks. This is called overdubbing. To set upward for overdubbing, make sure that is enabled (on) which is its default setting. See the tutorial set Recording Multi-rails Overdubs for more assist with overdubbing.
| | Before overdubbing it is recommended to perform a latency test to determine the optimum latency correction, and then set the value of Latency correction in Devices Preferences.
|
If you agree the push button down the Tape button in Transport Toolbar will temporarily change to ![]() . Then clicking on this modified Record button, or using the shortcut Shift + R will cause Audacity to create a new track and begin recording on that rails from the current cursor position (or from the left edge of a region on the Timeline).
. Then clicking on this modified Record button, or using the shortcut Shift + R will cause Audacity to create a new track and begin recording on that rails from the current cursor position (or from the left edge of a region on the Timeline).
If there is a region in the Timeline, that region will be recorded in a new rail.
Timer Recording
Nonetheless some other style to record is using the Timer Record utility, institute in the Transport Carte du jour.
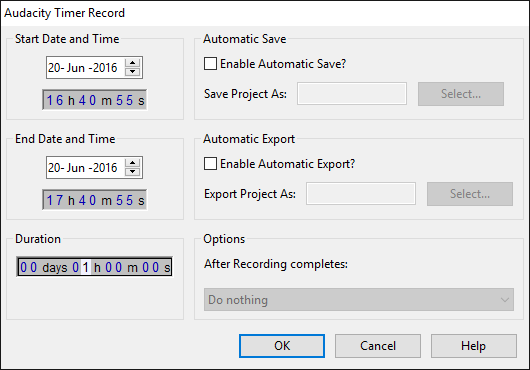
Use it to start recording later, or to record for a certain duration before stopping.
Sound Activated Recording
If you plow on you lot can make recording pause until the input level exceeds the specified threshold level at .
Links
> Quick-Play
> Scrubbing and Seeking
> Timer Recording
> Punch and Roll Recording
Source: https://manual.audacityteam.org/man/playing_and_recording.html
0 Response to "How to Stop Audacity When Recording and Then Record Again N the Same Track"
Post a Comment